Monday, 15 June 2015

A Gallery of Bread

Time flies, so I've decided to have a look back at some of my favourite loaves (and other things) over the years.

Sourdough square loaf
Baked in a square tin in my gas oven, this golden loaf...

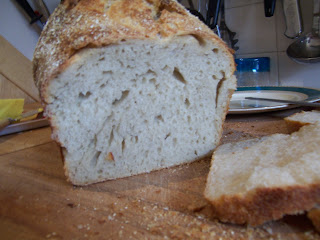
Sourdough square loaf inside
... has a moist, chewy texture. A true Sourdough.

Sourdough long loaf
From the pizza slab, fresh farm-style bread
 

Sourdough - dough stage
 A flat foccaccia-style loaf rests on my pizza stone before going in to the oven.

Sourdough flat foccacia-style
And comes out rustic and golden


Sourdough - dinner or lunch rolls and a loaf
  Economy day - A loaf and 4 buns

Sourdough blueberry bagels
 These were some truly awesome blueberry bagels... boiled, then baked, glazed with sugar and stuffed with fresh blueberries.

Sourdough bagels with cinnamon, blackstrap and blueberries
 So I had to keep going. I then made a richer, darker bagel with cinnamon, blueberries and blackstrap molasses.
Sourdough buttery croissants
Tried bagels... why not croissants? It requires a bit of elbow grease to work in the butter, so it layers, but it's so worth it!
Sourdough hi-top loaf of bread
 A VERY hi-top loaf...

A fine slice of bread

...with a light, chewy middle

Sourdough round loaf in pot
 The classic method of baking in a covered iron pot produces a rich, caramel colour.
 
Sourdough round loaf
 Another beautiful round country-style loaf

Fresh bread and butter - sourdough style
... and the only way to have it is with unsalted, cultured butter.

Twin sourdough loaves baked in silicon tins
 A pair of twins, from the oven. My first attempt at baking in silicone trays - not my favourite!

Sourdough pizza

As an Italian mamma said to me, "the taste is all in the base". While she had a wood stove in her Bondi garage, these pizzas made in my gas stove are not only the most popular item in my house, but they taste even better than her wood fired ones. She should have used sourdough starter instead of yeast!


Sunday, 7 June 2015

About Sourdough Starters

About Sourdough Starters

Introducing "the family"

No it's not The Godfather part X111.... I have previously talked about how to make a starter - or, to use its old school name, the sourdough leaven. As the Bible says, a little leaven leavens the whole lump. Sounds powerful - so who exactly are these 'leaven' guys? 

The starter is a group of microscopic yeasts who live in a flour and water 'swamp' and multiply whenever they are fed. What do they eat? Flour. Plain, white organic, rye - whatever. They are basically the lactobacillis culture found in yoghurt and sauerkraut. They love the heat, so to slow them down they live in the fridge. 

The Swamp Thing 


When they get to room temp and are fed some more flour, they get all 'active' and start to breed like rabbits. This results in a spongy mixture, not unlike foamy pancake batter, that we add more flour to and make bread dough. They are highly effective critters, killing anything that stands in their way - including any bacteria that is not part of their family. So if you use a dirty spoon to mix them, they will 'kill' any contaminants. These critters are powerful - that's why they are so good for your tummy. And why yoghurt and other fermented foods are so good for you.


Sourdough Yeasties will attack anyone who's not "in the family"


They don't just attack contaminants - they eat all the 'bad' parts of a wheat grain. Research has proven that the wild, strong yeasties will eat up to 90 per cent of the gluten and phytic acid in wheat. Phytic acid cannot be digested by humans - it acts as a 'shield' around the wheat grain to prevent our tummies from digesting the good stuff in the wheat. The wild yeasts eat all this stuff up in a process known as 'predigestion'. 

Commercial bread is made with commercial yeasts, which are weaklings that work superfast and wouldn't have the time to 'predigest' the wheat, even if they had the strength to - which they don't, as they have been cross-bred and inbred for so long. The difference between sourdough leaven and commercial yeasts is much like the difference between a wild boar and a farm pig. Get the picture?


 Sourdough versus commercial yeasts - who would you pick in a gluten fight?


As for naming my starter - I haven't, but others before me have. Whether you give your yeast community a single name, like "Greg" or the name of a village, like "Tiny Yeast Town" is up to you. I just call them "my little guys".

Thursday, 2 April 2015

Pizza!

Sourdough Pizza....


Above: Homemade sourdough pizza ... the crust is the best bit!

Follow instructions to make a basic bread (see previous post).

But when you take the bread out of the fridge in the morning... follow these simple steps.

Roll out dough on an oiled board to a flat pizza shape. The dough should be very elastic. Place on a pizza tray to rise in a warm room for an hour to an hour and a half.

Top with homemade tomato sauce (see below), cheese and and bake! Sure, you can add other toppings, but remember - the crust is the best bit!

And unlike regular pizza, you won't feel a bit bloated!

Homemade tomato garlic sauce
  • 1 can organic tomatoes, Italian
  • 6 cloves fresh garlic
  • salt, pepper
  • olive oil
  • tomato paste (Aldi organic is nice)

Fry sliced garlic in 3 tbspns olive oil till light gold - not brown.
Add 1/2 small can tomato paste. Stir 1 minute.
Add tomatoes, salt, pepper and more olive oil
Simmer 30 mins. Cool slightly. Puree with a hand blender.
Top pizza.

Wednesday, 7 January 2015

Honey Cornbread Recipe

This honey cornbread was baked in a tin in my gas oven.

A new loaf!

I’m going to bake honey cornbread today. Yum. I will also add a few more pictures and use this opportunity to do a quick ‘review’ of the whole process for those who still have questions – or if you just want the whole process on one page.

Phase 1 - "Starter" revision

  • Remove your starter from the fridge. Tip into a bowl and mix with a cup or two of water. Add enough plain flour to form a runny pancake batter. Cover with plastic wrap and a tea towel and leave overnight till it bubbles and is all foamy. If you get a layer of liquid on the top and no action after a while, add more food and stir again!
Phase 2 - "the Sponge"
  • Take a few tablespoons of bubbly sponge and place in a screwtop jar with a hole in the lid, along with a teaspoon of plain flour to keep it fed for the week.
  • Place jar in fridge where it will live until the next loaf.

Phase 3 - "the Dough"
  • Take the bowl of foamy sponge and add to it 1 to 2 tspns of salt, 2 Tbspns honey. Stir.
  • Add 1 cup corn meal/ corn flour (not polenta - corn meal is a little finer in grain. Kalla is a good brand and is sold in Coles).
  • Add 1/2 cup of gluten flour. Stir. Note: Gluten is particularly important in this recipe as corn has no gluten. Therefore to make a loaf that rises properly, is chewy and ‘bready’, gluten must be added to ‘strengthen’ flour.
  • We have already added the corn meal/flour in the last step. Now, as we need a mix of corn and plain white flour (preferably organic) for this bread, we will now add the white flour. Gradually stir in white flour to the mix, in half-cup measures.
  • When the dough starts to ‘stick together’ in a clumpy mass, turn it out onto a floured board. Fill the empty bowl with water now or you won’t be able to clean it later as sourdough has a habit of drying impossibly hard…!

  • Begin kneading, adding more plain white flour if it sticks - not too much. Keep the dough wettish.


  • It’s ready… shape into a loose ball and…..
  • Place in an oiled bowl and cover with cling wrap and a tea towel.
  • Leave in a warm place to rise while you enjoy a good book!
  • NOTE: Clean your kneading board (or bench):
    A wooden cutting board is best, as it doesn't host bacteria. Simply scrape down and rub some coarse salt in to get rid of any doughy bits.

Phase 4 - "the Punching Down"

  • The dough is risen nicely (it took about 4 hours as today was pretty hot) and does not 'spring back' when you poke it with your finger.
  • Flatten the dough down gently.
  • Fold the dough into a square.
  • Now we will start to stretch the dough. Begin by cupping the dough into your hands and start to ‘pull’ the dough down and under itself, stretching and cupping the dough. This process is much gentler than ‘kneading’ the dough as we don’t want to be rough with it at this stage.
  • Stretch, and pull the dough under itself.
  • Do this seven or eight times. That's enough - see the small tear at the side? That means the dough is stretched to its limit.
  • Place in a plastic bag secured with a knot to stop it growing too much in the fridge.

  • Place in the fridge overnight or up to 36 hours. The longer the resting time, the more ‘predigested’ the bread is – but the texture is different, too. Experiment!

Phase 5 - The baking

  • Good morning – crikey the dough has risen, even in the fridge – it’s nearly filled the freezer bag! That tends to happen in summer….
  • Place loaf gently in a floured loaf tin. I’m making a square loaf today.
  • (Note – at this stage if you wanted to make pizza or flatbread you’d roll the dough out and flatten it completely, taking all the air out, then leave it to get to room temperature before baking the pizza/flatbread on a pizza stone).
  • Leave the bread to rest, covered, for 2-4 hours, until returned to room temperature. It will also rise a little more.
  • Preheat the oven to 210C at least half an hour before baking. Place a pan of water in the bottom of the oven to act as a ‘humidifier’ to help make a that crispy, chewy sourdough crust we all love.
  • When returned to room temp and risen, 'score' or cut a pattern in the bread with a sharp knife. Dust with corn flour.
  • Bake for 40 to 50 minutes. Check after 30 minutes.
  • Below is a picture of a loaf that is not yet propertly cooked …See how it is too light in colour and when you tap the loaf it does not sound 'hollow'.
  • NOTE: It’s better to have an overcooked loaf than an undercooked one – as sourdough has no ‘floury’ taste it is almost impossible to burn. And the browner, the tastier, you will soon find.
  • Below is a picture of a properly cooked loaf. The loaf is quite brown, and has a very ‘hollow’ sound when you tap it on the bottom.
  • Use a knife to get it out of the tin if it sticks a little on the sides.
  • REMEMBER to wait 1 hour before eating the bread - technically it's still 'cooking' and it will go hard if you cut it prematurely. It will be difficult but you must wait...
  • Enjoy!


Friday, 2 January 2015

Cheat's Bread (Ciabatta)


Here's my easiest bread yet, a chewy Italian ciabatta.

Just follow the recipe as per Lesson 11, but use all white plain organic flour, for authentic taste. However, when you get to the kneading, follow these instructions:

* Don't add too much flour to the 'sponge'; just enough so it holds together, but still nice and sticky.
* Proof and age in the fridge overnight
* Take it out of the fridge in the morning and lay it on a nice stone pizza slab.
* Shape into a ciabatta shape (about 5-10cm high, 30cm long, 15cm wide)
* Let it rise, covered, in a warm place for 2 to 3 hours, till room temperature.
* Bake in a 200C preheated oven until brown and 'hollow' to the tap
* This bread should be chewy and 'holey'** in texture.

**Blogger cannot be held responsible for size of holes, as this is entirely dependent on the mood of the sourdough yeasties :)

Variations:
Full Cream Milk Powder: Add 1/2 cup of milk powder when adding flour to make the dough. It adds a nice 'white bread' taste. Lovely for making sandwich rolls for work. But still healthy, 'cos it's sourdough!!!
Bake the bread in a loaf tin: You'll get a different shape, but it will be nice to slice and toast, serve with avocado and tomato!

This is by far the easiest sourdough recipe, because of the lack of kneading (easy on the elbows).


Sunday, 3 August 2014

The Next Phase - Grind Your Own


-->
A new phase - grinding your own flour

There may be some of you out there with access to a flour grinder. There is the odd Eastern Suburns health food shop who provide free grinding facilities onsite if you don't have your own.

WHY GRIND? Because flour is a grain, and grains have oils in them. So, when you grind the little wheat berry you need to use it quicksmart (within a week) or the good oils will start to go off. This is also why you store olive oil in a dark cupboard or the fridge, and why you don't keep nuts for ages unless they are roasted first - the oils in them start to lose their goodness and the Omega 3s and 6s become useless.

The relevance to flour? As a grain it has many parts - the outside husk, the endosperm (which is what semolina is), the wheatgerm (where the oil is) etc. So what the supermarkets do is sift all that good stuff off and what you're left with is..... white powder. And not the fun kind (by that I mean sugar). Just useless dust. Easily digestible dust, but dust nonetheless. Oh but what about wholemeal flour, you say? Well that is usually just white dust with some tough oiless bran sifted back in. But it's almost never the whole crushed grain of wheat... because of the spoilage reasons I've just discussed.

So let's make a superquick (for sourdough, anyway) loaf from go to whoa using your own ground flour.

Phase 1 - Grinding your flour
  • Get some wheat grain from any health food store. Grind it using their grinder or your own. Recommendation : fine ground to encourage maximum absorption when you mix it with the liquid. And easier to handle.


Phase 2 - From starter to sponge
  • I imagine here you already have a starter. If not, go to my section on how to make one. The ingredients you'll need are flour and water. Seriously. Nothing else! It is dead easy, once you get it to live....
  • Anyway, take your starter from the fridge and pour it into a bowl. Add a cup or two of lukewarm filtered water and a cup or two of the flour you have just ground. It needs to reach pancake batter consistency. Let this 'sponge' stand for 8 hours to overnight - until it starts to bubble healthily (like a sponge, hence the nickname). If it looks slow, be patient - colder areas take longer and may require a heater and some cling wrap to keep the bowl warmish. Humid areas - lucky Brisbanites - have it much easier. But here in Sydney, I always get a fabulous sourdough summer or winter: takes longer in winter but the bread rises just as high.

Phase 3 - The dough
  • Your bowl of sponge should be bubbly. If it is dormant with a film of liquid on top then wait a bit longer - add a spoon of flour and mix it up vigourously to awaken it.
  • Once it is bubbly, put half a cup of it into a clean glass jar with a hole in the lid and back in the nether regions of the fridge (or however you store your starter).
  • Take the remainder of the sponge and add a pinch or two of salt.
  • To the bowl add a cup or so of the flour you have ground and mix it around.
  • Add flour until it forms a loose dough ball that just holds together without being too sticky. But don't go to too much effort - the wetter the better I've found with sourdough over the last couple of years.
  • Grease another bowl with olive oil and place the dough ball in. Spray some oil on the top of the dough. Cover with cling film and a teatowel. Leave to rise in a warm place 2-5 hours, depending on the weather.

Phase 4 - The resting
  • When is it risen? Well usually it doubles in volume, but this is sourdough remember so that can be deceptive. Sometimes it just grows 50% in winter in the first rise, but that is no indication of the final bread. The best way to tell is to poke it with your finger. If it springs back it could do with more rising. If it doesn't, it's ready.
  • Take your ready dough and gently pat it down, Form into a loose ball and squeeze it a bit (I have this illustrated elsewhere on this blog - I have an effective squeezing method).
  • Pop it in a plastic bag and peg the bag shut. Put it in the fridge overnight. I use a plastic bag because my bread tends to grow too much in the fridge if I don't - I need to keep a lid on it so it save its final rising for the oven. Rest your bread in the fridge anywhere from 12 to 36 hours. The longer it rests, the more sour the flavour. The main reason for a long rest is that the sourdough yeasties 'pre-digest' all of the more annoying parts of the flour, like the gluten and phytic acid which are indigestible to many. So the more gluten-intolerant you are, the more you will love sourdough!

Phase 5 - The pre-baking
  • Take your dough from the fridge. Shape it into a long fat shape, like a thick baguette. You could also make it round or whatever but don't play with it too much, it's sensitive! Just gently pull it into shape.
  • Place on a baking tray, or a pizza stone. Dust with flour and cover with a teatowel. Leave to get to room temperature, which could take a couple of hours.

Phase 6 - The baking
  • Here is my secret to get your loaf to rise - we are talking maximum rising power. Slash a couple of deep cuts in the loaf with a sharp knife.
  • Turn on the oven to moderately high - 200C.
  • Place a pan of water in the bottom of the oven.
  • Place the loaf straight in - DO NOT PREHEAT THE OVEN!!!!!!!!!!
  • Why? Because as the oven slowly heats up it gives the sourdough one last chance to rise in the oven. You get a great rise, and a wonderful chewy crust on the bread.
  • Check your bread in 30-40 minutes. It is done when it's a medium-dark golden brown. Not too light - the sourdough has to reach the right internal temperature.
  • Remove from the oven. Let it rest one hour. DO NOT EAT FOR ONE HOUR. It needs this time to finish cooking - cut it too soon and it could turn rock hard.

Enjoy!


Thursday, 17 July 2014

How to make a loaf - the easy way

Above: A delicious simple wheat loaf, baked in my ordinary gas oven.
Sourdough is a fun process, but it can be time consuming for the beginner. If you are familiar with sourdough and have made your own starter, these shortcuts should help.

These shortcuts help you make a loaf - super fast! The only slow part is resting it in the fridge overnight, but this is necessary - or the yeasties won't predigest the 'bad' parts of the flour properly and you'll feel very bloaty.

If you don't have a starter yet, relax - check out my 2007 blog "Lets Bake Bread" #1 to learn how to make your own little community. 

Here I have distilled down the basics so you can get a loaf happening:


1. Have your own starter. YOu can cultivate it in your own kitchen from flour, water and air. See 2007 "Let's Bake Bread #1" to see how to make your starter.

2. Follow the instructions in the January 2008 Blog - Honey corn bread. Or read here:
Put your starter in a bowl with lukewarm, filtered water and organic plain flour. Equal parts - 2 cups water, 2 cups flour. Stir and cover with a tea towel overnight. In the morning it should be bubbling beneath the surface. If not - wait another hour or two.

I love to bake my loaves to a rich, deep brown.
Funny thing about sourdough is that it is
very hard to burn,
and even a deep brown loaf tastes beautiful.


3. When bubbled, put some sponge in the fridge in a jar to make a new starter for next time (a few tablespoons, with a teaspoon of flour for it to 'feed' off when in hibernation). Take the rest of the sponge and add enough plain organic flour to it to make a very sticky dough that just holds together.

4. Let it rise for around 1-2 hours, depending on the strength of your starter - you know your own critters the best. 

5. Gently 'pound down' the risen dough and leave in fridge overnight. I like to put the dough in a plastic bag with a peg to stop the dough over-expanding and 'eating itself' too much.

6. Take it out of the fridge in the morning and lay it on a nice stone pizza slab, a cast iron pot or a bread tin. Different baking methods give different crustiness and taste.

 Bake in a pot, on a slab or in a tin

7. Leave dough in a warm place for its second rising - 1 to 2 hours. Before baking, slash a criss-cross or other pattern with a knife. This isn't just for looks - it helps the bread rise more.

8. For an extra 'rise', don't preheat the oven - throw the bread in 'cold' and turn the oven on to 200 degrees. As the oven heats up the bread gets and extra rise. Cook until quite brown and 'hollow' to the tap.

This is a quick bread with a great texture - should be chewy and 'holey': 
When made with less flour (a more 'wet' dough) and almost no 
kneading, your bread will have the holey, chewy, delicious 
traditional sourdough taste and texture

Thursday, 1 May 2014

Let's Bake Bread # 4 - To the Ovens!!


Above: Crusty Rye Loaves using the pizza stone method
To the Ovens!!

Stage 4 -: Baking the dough

There are a few methods which I use regularly: loaf tin, cast iron pot or pizza stone. All taste great, and are quite easy methods. With the pot you get a classic round loaf and deep golden colour and are ensured even cooking – great for beginners. With the stone you get a nice ‘earthy’ taste and can make shapes – baguettes or even flatbreads but you do have to check the underside to make sure it cooks properly and place a pan of water in the oven to ensure a humid environment. With the tin you get a very easy to cut loaf, great for toast or sandwiches.

Method

  1. Unwrap the dough and set aside at room temperature for 3 to 4 hours, until it reaches room temperature in the middle and is fully risen and doesn’t spring back when you press it with your finger.
  2. At the same time, pre-heat your oven to 230C for around 50 minutes to an hour.
Cast Iron Pot Method
  1. Place the cast iron pot in the oven to heat for about an hour. Wearing oven mits, invert dough into heated pot that has been dusted with flour.
  2. Sprinkle a light veil of flour over the dough. Slash the dough with a sharp knife or razor to create that classic sourdough pattern but more importantly to help the dough cook. Bake, covered, for exactly 30 minutes.
  3. Remove lid and bake for a further 10 minutes till dark golden and bread sounds hollow when tapped on the bottom.
  4. Remove immediately from pot and set aside in a wooden bowl or plate to cool for AT LEAST one hour. The bread is still ‘cooking’ at this stage and should not be cut for at least an hour after being in the oven or it will become tough.
  5. When you can’t wait a moment longer after the hour is up, brew a nice pot of tea and cut off a thick slice, enjoyed with fresh cultured butter.
Pizza Stone Method
  1. Place a baking pan filled with water on the floor of the oven. This will provide the necessary humidity for the bread to colour, which you don’t need when you use a cast iron covered pot.
  2. Invert dough onto heated pizza stone that has been dusted with flour. Sprinkle a light veil of flour over the dough.
  3. Slash the dough with a sharp knife or razor to create a pattern and to help the dough cook. Bake, for exactly 20 minutes.
  4. At this stage you may need to turn bread over and bake the underside for a further 10 to 15 minutes so it sounds hollow when tapped on the bottom. As above, remove immediately from pot and set aside in a wooden bowl or plate to cool for at least an hour before eating half the loaf in one sitting!

Left: My Country-style white loaf cooked on the pizza stone, flavoured with salt and blackstrap molasses for extra colour and nutrition.


Loaf Tin Method
  1. Proceed as for pizza stone method, above, ensuring oven has a water bath in it.
  2. Make sure loaf has proofed IN THE TIN after it has come out of the fridge. When the loaf has come to room temperature and had its final rise in the loaf tin, slash and sprinkle with flour and bake as per pizza stone method.
Note: No more dry, floury-tasting bread! When friends and family taste this bread, you may have to start making two loaves at a time, like I do. Or even more……once you’ve had real bread, there’s no going back.
Next week: Let's make a plaited Brioche.

Let's Bake Bread # 3 - The D'oh!

We are getting ever closer to putting our loaf in the oven. Onto the next stage.

Stage 2 -: Making the dough
Ingredients:
-Your ‘sponge’ mixture (which will be foamy by this stage)
-3 to 5 cups of organic rye bread mix (or half white flour, half rye flour) -½ cup gluten flour (particularly important if your flour is not ‘strong’. Don’t worry about the gluten – the sourdough process itself , known as ‘pre-digestion’ will digest all of the gluten so your bread will be yeast- and gluten-free but without the gluten it may not rise enough)
-1 teaspoon salt
-1 tablespoon blackstrap molasses, or golden syrup or brown sugar (optional, but particularly tasty in rye bread)
-2T olive oil (optional)

Method:

  1. Take your bowl of ‘sponge’. It should be at its foamiest stage for maximum bread-rising power. What you are about to do is ‘feed’ your starter by adding more flour, but you are making it into a dough, so it will be solid, not runny like when you normally ‘feed’ your starter. What will happen next is that your starter will spend the next few hours ‘eating’ the flour in the dough. It will eat the phytic acid surrounding the grain and the gluten in the flour. It will leave little holes in the bread where it has eaten the flour (this is why bread has that ‘holey’ look ) and will give off carbon dioxide (that yeasty smell).
  2. To your bowl of starter add the salt, oil and molasses. Stir
  3. Add 1 cup of rye/wheat flour and the gluten flour. Mix.
  4. Keep adding flour in half cupfuls and stir. When it’s too stiff to stir, turn out onto floured board and pull together as a dough, adding more flour as needed.
  5. Keep kneading the dough for about 10 minutes, making sure to add more flour whenever the dough becomes sticky. You will probably be adding more and more flour right up to the end of the kneading time. Unlike regular bread, sourdough bread is very wet and ‘thirsty’. Just when you think you’ve added enough flour and it’s dry and pliable, it suddenly becomes all wet again and you find you need to add more flour to knead it! DON’T WORRY – just keep on adding flour as long as it’s thirsty. Sourdough yeasts, unlike commercial yeasts, are alive and need their food!
  6. After 10 to 15 minutes of hand kneading, you may be tired but you’ll have a smooth, not sticky ball of dough.
  7. Place in a greased bowl, cover LOOSELY with cling film (this speeds up the rising process by keeping warmth in as long as you leave air gaps), and cover with a tea towel. Leave in a warm place to rise for 2 to 5 hours, until it has doubled – or tripled if it’s a warm day – in volume.
Stage 3 -: Proofing the dough
Proofing is the most important stage: This allows the ‘pre-digestion’ process to take place and for the healthful yeasts to digest all the bad parts of the flour. Very important stage! The longer it ages, the more the slight sour flavour is accentuated. You need around 15 hours ageing to deactivate the phytic acid.
  1. You can tell the dough has not fully risen if you poke it gently and it springs back. When it has risen all it can, there will be a small indent left behind when you poke it with your finger.
  2. When the dough has fully risen, punch the dough down gently. Flatten down into a big circle and let it rest 5 minutes.
  3. The only tricky part – fold the edges of the dough into the centre and press with your fingertips to seal into a ball. Do not overwork dough. Shape by cupping our palms over the top of the ball and apply firm but gentle downward pressure. Stretch the surface of the dough down under to form a neat ball. Keep pulling and stretching downwards like this around 6 to 8 times, being careful not to tear the surface of the dough.
  4. Turn dough over and pinch the seam to form a very tight seal.
  5. Place in bowl and cover with several layers of plastic wrap and place in the refrigerator to age fro 8 to 24 hours, even up to 36 hours.
Next..... Putting the loaf in the oven!

Let's Bake Bread # 2 - The Sponge (No, not the Seinfeld Episode)

Now the moment you've all been waiting for, baking our first Sourdough loaf. This is beyond exciting, and can I say 'good on ya mate' to everyone who's stuck with me so far. You've done a beaut' job to get this far.

Aussie jingoisms aside, thanks for coming on this ride and here's to the success of your first loaf. Let's get started!

Part B
Baking Bread

This is such a satisfying process: you won’t believe what you can do with your own two hands!

Stage 1 -: Making the ‘sponge”
What on earth is a sponge? It’s basically a great big bowl of foamy starter and it’s the basis of a good loaf. It’s the first step in baking:

Ingredients:
-Your jar of starter from the fridge
-1 cup filtered warm water
-1 cup plain white organic flour
- Clean bowl (sterilise with boiling water at this early stage) and wooden spoon.

Above: Look closely, this fully active starter is really foamy and ready to bake bread!

Method

  1. Remove your starter from the fridge and pour into clean bowl.
  2. Add water and stir with wooden spoon till dissolved.
  3. Add flour and mix. You want the consistency of very thick pancake batter. Add more flour or water to reach this consistency.
  4. Cover LOOSELY with plastic wrap, leaving a bit of space on the sides for air and cover with a tea towel. I use the plastic wrap because in winter or cooler climates you want to keep the heat in and this really speeds up the process.
  5. Leave in a warm place (sunroom, windowsill) for between 4 and 12 hours. It will begin to get a few bubbles in the first two hours, then more and more bubbles will form until it’s foamy. At this point it’s ready for the next stage…..
Note: sometimes I’ll age my sponge by leaving it out overnight, especially if it’s slow to bubble, like in winter. By morning it may have a layer of hooch so I’ll mix in half a cup of flour and leave it for another 3 or so hours till it bubbles a second time. This makes a stronger sponge, but it’s not really necessary unless your sponge is having trouble getting going.